Cybersecurity Fundamentals (Part 4)
Difficulty Level: ⭐
I will show you how to set up a lab for network testing with PNET Lab from Windows, using VMware.
IMPORTANT to have VMware Workstation or VMware Player installed, SSH (if you still have it), FTP (Filezilla or WinSCP),
Firefox or a web browser that supports HTML5, enough space on the hard drive, an internet connection, and at least 8GB of RAM.
What is PNET?
It is a platform designed to create and manage network simulation environments.
PNET Lab differs from other emulators in that it allows the installation and configuration of real network software on the created VMs,
offering a more realistic experience closer to a real network environment.
What is Eve-ng?
It is an emulator that allows users to create and simulate complex network environments. It is an ideal tool for teaching and
learning networking, as it allows students to experiment with different
network configurations and protocols without the need for physical hardware.
Cisco Packet Tracer: Simulates networks based on Cisco devices
ADVANTAGES:
- It is ideal for beginners, with an intuitive and easy-to-configure interface.
- It is designed to align with programs like CCNA and CCNP.
- You don't need a powerful computer to run it.
- If you are enrolled in the Cisco Networking Academy.
DISADVANTAGES:
- It does not include devices from other manufacturers.
- Advanced functionalities, such as configuring real devices, are limited.
- It does not support virtualization of real device images (like IOSv).
PNETLab: Emulate complex networks with real device images
ADVANTAGES:
- You can emulate devices from Juniper, Palo Alto, Fortinet, among others.
- It uses real operating system images (IOSv, ASA) to simulate real devices.
- You can create more complex and realistic topologies for business environments.
- Ideal for advanced certifications such as CCNP, CCIE, or testing in heterogeneous networks.
DISADVANTAGES:
- It requires a more powerful machine with enough RAM and CPU.
- It is not as friendly for beginners.
- You need to get the device images, which can be more complicated.
CISCO PT vs PNET LAB
- For beginners or CCNA students, Cisco Packet Tracer is sufficient to learn basic concepts and use Cisco devices.
- For advanced environments (CCNP, CCIE, or heterogeneous networks), PNETLab is ideal for its support for real images and multiple manufacturers.
Benefits of a Laboratory
- 💫 Secure environment: They allow testing new configurations and technologies without affecting the real network
- 💫 Flexibility: They offer the possibility of creating a wide range of network topologies and test scenarios
- 💫 Scalability: They allow scaling virtual networks to a large size to test their performance and reliability.
- 💫 Cost-effectiveness: They are an economical alternative to creating physical networks for testing and training
It is necessary to have VMware Workstation or VirtualBox for the creation of the VMs and to have enough space.
Preparation of the Test Environment
| Name | Description |
|---|---|
| 🐦 VMware Workstation | LINK TO VMWARE |
| 🐦 PNET Lab | LINK TO PNET |
| 🐦 Windows Client Side Eve-ng | LINK TO EVE-NG |
| 🐦 Kali Linux | LINK TO KALI |
| 🐦 UNET LAB DRIVE | LINK TO UNET LAB |
| 🐦 DOCS | LINK TO DOCUMENTATION |
Step 1: PNET Installation
Download the PNET machine from the official site, you should get a .OVA that you will proceed to mount in VMware. At this time the file is called PNET_4.2.10.ova.
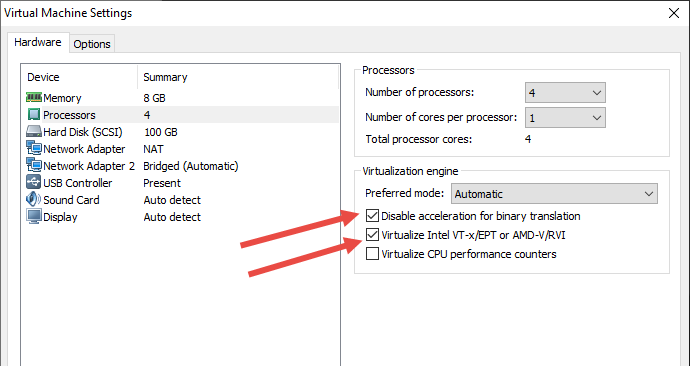
Once downloaded and mounted in you must activate nested virtualization as shown in the image.
Once that is done, turn on the machine, in it you will only see the terminal, enter the user root and the password pnet.
This will take you to the configuration screen, enter a password you want, in domain
it does not matter (unless you have one and want to use it), you select Static IP, and finally the time server, this will restart the machine.
Now in the IP that is shown on the PNET screen, enter it in your Windows browser: Select the ONline option. It will show you the login screen, in it you must create an account. PNET will redirect you to create an account.
Once you create it, you return to the login screen of the IP given by PNET in VMware.

When logging in, select Console. The browser will show an alert message when sending the information, we will say to send it anyway since it is hosted by ourselves.
When you enter you will see something like this:

Here the laboratories will be created, you will be able to monitor the status of the machine and more things. Before creating a laboratory I will show you the next step.
Step 2: Installation of Add-ons
On the Eve-ng page we will download the Windows Client Side.

This is a pack of tools, in this pack you will find Wireshark, PUTTY, VNC and more, the versions are a bit old but they are useful.
You can also download the tools separately.
IMPORTANT Install VNC and Wireshark on the C:\ drive
Step 3: Installation of addons
Now we will install the necessary addons, pnet is handled similarly to minecraft, that is, we will add mods to it.
We will install a Mikrotik RouterOS.
A simple way to download images is to use the ishare command.
Note: ishare in Pnet is obsolete so we will use ishare2 for this we will execute the following
command directly in pnet from vmware or through ssh from a terminal in
windows, which is simpler.
powershell1wget -O /usr/sbin/ishare2 [https://raw.githubusercontent.com/ishare2-org/ishare2-cli/main/ishare2](https://raw.githubusercontent.com/ishare2-org/ishare2-cli/main/ishare2) > /dev/null 2>&1 && chmod +x /usr/sbin/ishare2 && ishare2 2
Now that you have ishare2 installed I will show you the next step.
Step 4: Image Search
With this command we will search for images for qemu or others, several routers are handled with iol like cisco and linux images in qemu like kali.
powershell1 ishare2 search all 2 ishare2 search bin 3 ishare2 search qemu 4 ishare2 search dynamips 5
To download the images, the following command is used <number> is the ID that appears in the previous list.
powershell1 ishare2 pull bin <number> 2 ishare2 pull qemu <number> 3 ishare2 pull dynamips <number> 4
and DONE! the image is downloaded, formatted according to the Eve-ng DOCS and the permissions are assigned automatically, super simple, isn't it?.
Another alternative is to use the UNET LAB Drive, there are the folders and the disks ready to be downloaded and used.
the images or disks must correspond with their format according to the Eve-ng documentation in /opt/unetlab/addons/qemu/
The only important thing is to check the status of the PNET machine and the remaining space.
https://github.com/pnetlabrepo/ishare2
Step 5: Laboratory Creation
Now we will create the first laboratory, in the browser once logged in and inside. click on the icon to create a laboratory.
You will see a blank canvas and the PNET logo, just right-click and you will see several options. you must click on Node.

This will create a node, and you should see the systems or devices that you downloaded, in my case I downloaded a mikrotik.

A panel with configurations for the router will be displayed, ram memory is assigned, etc. and that's it.
We will add a Kali, if you downloaded a Kali image from ishare2 you should already have it,
if you downloaded it in qemu from the page you should just drag it to /addons/qemu,
but if you downloaded the iso you will have to install the system with its disk (something I will show later).
Once mounted, just turn on the button and wait. we double-click and we will see its QEMU interfaces, this is possible thanks to the Eve-ng tools of the Client Side.

As you can see in the image in this example I already mounted a kali, an extremeos and a mikrotik,
but the kali has no internet connection, since the ping to google does not go out, well this is because a network output must be created.
Step 6: Creation of Network Output
Now you will select the Network option

Differences
NAT (Network Address Translation):
Purpose: Allows multiple devices on a local network (LAN) to use a single public IP address to connect to the internet.
How it works: It transforms the internal private IP addresses into a public IP address. When a device on the local network
sends data to the internet, the router changes the private IP address of the device to its public IP address.
When the data returns, the router performs the reverse translation.
Advantages: Improves security by hiding private IP addresses and allows the conservation of public IP addresses.
Common use: It is used in home routers and in companies to allow multiple devices to access the internet using a single public IP address.
Bridge:
Purpose: Connects two different local networks (LANs), allowing them to act as a single unified network.
How it works: A bridge receives data frames from one network and sends them to the other network. It does not change the IP addresses of the frames, it simply retransmits them.
Advantages: Extends the reach of a network without the need to change the configuration of the devices.
Allows direct communication between devices on different local networks.
Common use: It is used in larger local networks to connect different network segments, such as in an office that has multiple floors or areas.
And finally the Management option will allow you to be on the PNET network, that is, you can ping from the host to the
machine or connect by ssh to the PNET machine while inside PNET (how crazy is that).
To connect you just have to drag the cable, make the connection to the port and that's it.
As you can see in the image I am connected to the administration network on this machine.

I know that all this is quite simple and my explanation was not the best but I try to detail it as clearly as possible..
Later I will show how to perform penetration tests on different systems in your laboratory.
- 💜 Access to the --> Blog
Thanks for reading
Sources
- 🔖 PNET and Eve-ng